If you’ve spent any non-trivial amount of time working with Hadoop and Hive at the command line, you’ve likely wished that you could interact with Hadoop like you would any other database. If you’re lucky, your Hadoop administrator has already installed the Apache Hue front-end to your cluster, which allows for interacting with Hadoop via an easy-to-use browser interface. However, if you don’t have Hue, Hive also supports access via JDBC; the downside is, setup is not as easy as including a single JDBC driver.
While there are paid database administration tools such as Aqua Data Studio that support Hive, I’m an open source kind of guy, so this tutorial will show you how to use SQL Workbench to access Hive via JDBC. This tutorial assumes that you are proficient enough to get SQL Workbench installed on whatever computing platform you are using (Windows, OSX, or Linux).
Download Hadoop jars
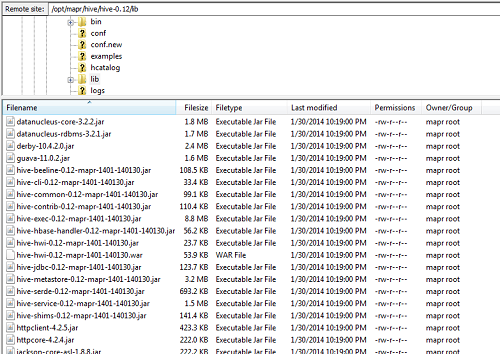
The hardest part of using Hive via JDBC is getting all of the required jars. At work I am using a MapR distribution of Hadoop, and each Hadoop vendor platform provides drivers for their version of Hadoop. For MapR, all of the required Java .jar files are located at /opt/mapr/hive/hive-0.1X/lib (where X represents the Hive version number you are using).

Download all the .jar files in one shot, just in case you need them in the future
Since it’s not always clear which .jar files are required (especially for other projects/setups you might be doing), I just downloaded the entire set of files and placed them in a directory called hadoop_jars. If you’re not using MapR, you’ll need to find and download your vendor-specific version of the following .jar files:
- hive-exec.jar
- hive-jdbc.jar
- hive-metastore.jar
- hive-service.jar
Additionally, you will need the following general Hadoop jars (Note: for clarity/long-term applicability of this blog post, I have removed the version number from all of the jars):
- hive-cli.jar
- libfb303.jar
- slf4j-api.jar
- commons-logging.jar
- hadoop-common.jar
- httpcore.jar
- httpclient.jar
Whew. Once you have the Hive JDBC driver and the 10 other .jar files, we can begin the installation process.
Setting up Hive JDBC driver
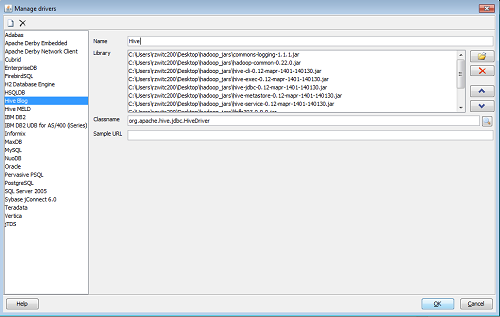
Setting up the JDBC driver is simply a matter of providing SQL Workbench with the location of all 11 of the required .jar files. After clicking File -> Manage Drivers, you’ll want to click on the white page icon to create a New Driver. Use the Folder icon to add the .jars:

For the Classname box, if you are using a relatively new version of Hive, you’ll be using Hive2 server. In that case, the Classname for the Hive driver is org.apache.hive.jdbc.HiveDriver (this should pop up on-screen, you just need to select the value). You are not required to put any value for the Sample URL. Hit OK and the driver window will close.
Connection Window
With the Hive driver defined, all that’s left is to define the connection string. Assuming your Hadoop administrator didn’t change the default port from 10000, your connection string should look as follows:

As stated above, I’m assuming you are using Hive2 Server; if so, your connection string will be jdbc:hive2://your-hadoop-cluster-location:10000. After that, type in your Username and Password and you should be all set.
Using Hive with SQL Workbench
Assuming you have achieved success with the instructions above, you’re now ready to use Hive like any other database. You will be able to submit your Hive code via the Query Window, view your schemas/tables (via the ‘Database Explorer’ functionality which opens in a separate tab) and generally use Hive like any other relational database.
Of course, it’s good to remember that Hive isn’t actually a relational database! From my experience, using Hive via SQL Workbench works pretty well, but the underlying processing is still in Hadoop. So you’re not going to get the clean cancelling of queries like you would with an RDBMS , there can be a significant lag to getting answers back (due to the Hive overhead), you can blow up your computer streaming back results larger than available RAM…but it beats working at the command line.